So it’s been a long while since I last worked on this Radarscope boardset. When I last looked at it I’d got it starting with a working CPU, but it was hanging before properly starting.
The research I’d done at the time had led me to believe it had a RAM issue. I sourced some replacement RAM ICs (2114) and put the boardset on my new workbench setup (I put one of my DK boardsets on the bench to test the setup):

So I started up the boardset to see if there were any changes since I last booted it (as these boardsets are very particular and sensitive to knocks). I flicked the power switch and was greeted with a familiar sight:

This is all that displays when the boardset is powered. It should display the high score screen and then cycle the attract screen (a demo of the gameplay). So the first thing to do was look at the RAM ICs on the CPU board. With the 2114 RAM chips it’s actually possible to “piggyback” the new chips onto the old:

This is not advised as a long term solution, but more as a way of trying to pin-point which chip may be causing the issues. The idea is to piggyback a new IC on top of all six RAM chips and see if we see any difference in what is being displayed. We won’t see anything legible (as the new chip won’t be able to fully function properly as it will be “fighting” with the old chip), but differences should identify the faulty chip. I fitted all six RAM chips to the board on top of the old chips and powered her up:


This was a positive step and by displaying something different tells me that more data is now passing through to the video output. The next step was to remove the new chips one by one and note any further differences. After removing the chips in order I ended up with a couple of different outputs:

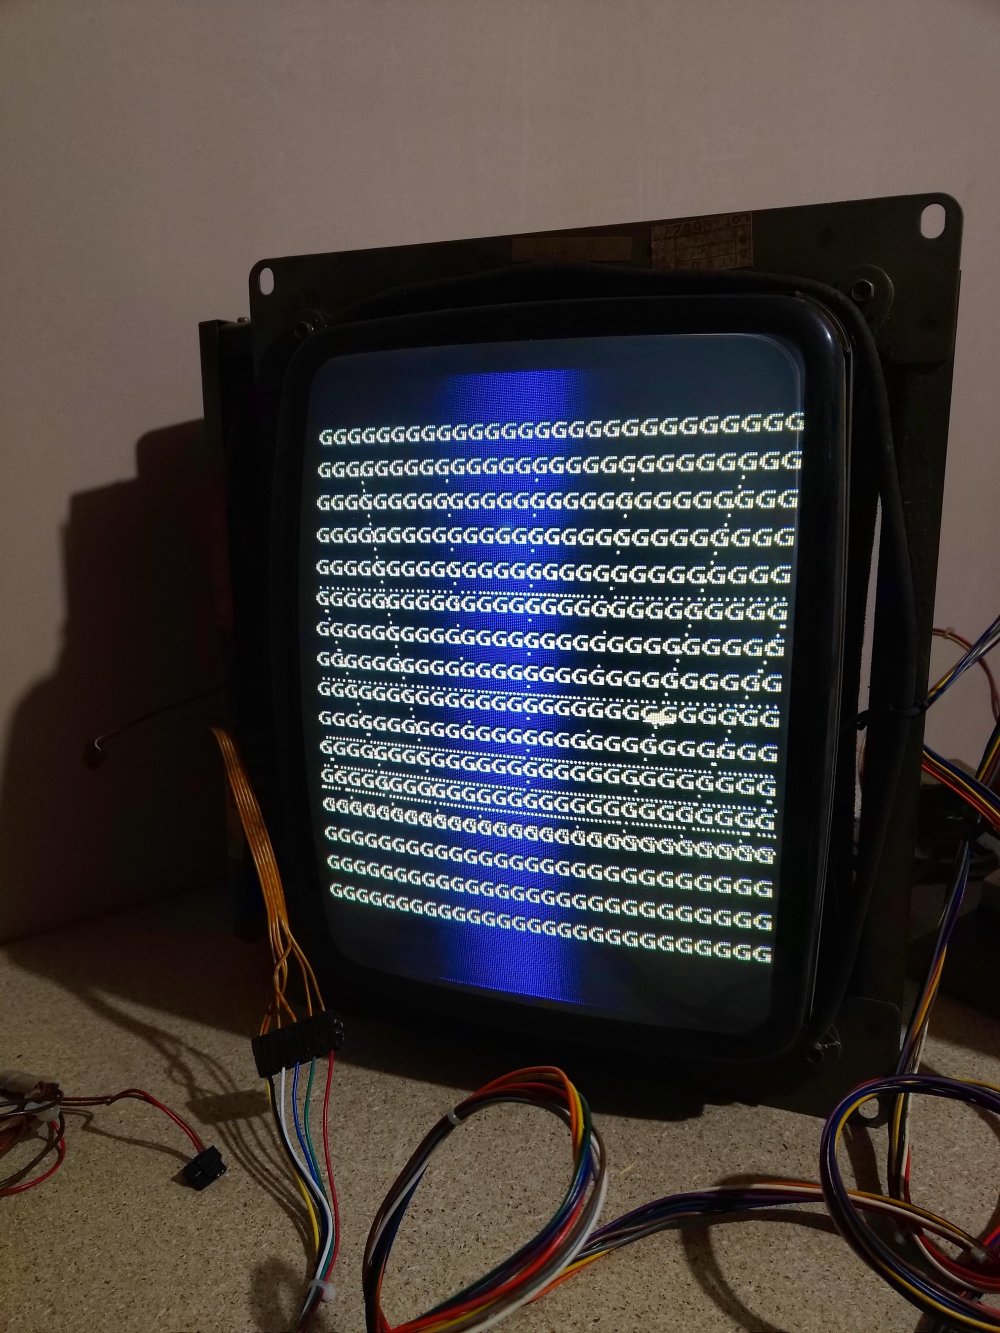
Now the first one of these is the same screen you get with a missing or dead CPU so was an interesting output when just tinkering with RAM. The second screenshot was different again, but this process didn’t really help me ascertain which chip/chips were causing the issues.
I was chatting to my friend Paul through this process who suggested it may be easier to remove all of the RAM and put sockets on the board. This meant I could replace the RAM chips one by one and not have the issues you get with piggybacking ICs. So out came my new desoldering station:

I was about to start when Paul suggested I might want to have a go with the desoldering station on something more expendable. I dug out an old Konami board that had got bundled with an old purchase and started trying out the desoldering station:


It quickly became clear that it was all about technique. Hold the tool on the board too long and you scorch the board, but not long enough resulted in only the top of the solder melting and not all of the solder being removed. This would leave you with a joint that was still soldered through the solder point, but too far away for the tool to melt. This then had to be resolved by adding more solder to the joint to allow me to try again.
Once I had the technique set out, I swapped out the boards and began work on the Radarscope board. The first chip came out with little to no trouble and just required a bit of encouragement to come off the board once all the legs were desoldered. Feeling confident I moved onto the next and disaster struck:

In my haste to work my way through all the RAM chips, I mistook a missed partial solder joint for a tight fitting leg. The result was a partially lifted trace (and part lifted solder pad). I have to admit, my heart sank at this point.
After calming down, I realised that these things will happen (and will happen less if I take my time and am slightly more diligent!) and I just needed to carry on. With a bit more time and care taken, the chips were removed one by one:


Each removal was cleaner than the previous so my technique (and patience) was clearly improving. After all six chips were off the board, I loosely fitted six sockets:

Next up was to crack out the soldering iron and see if I could manage 108 tidy solder joints. I got into a nice rhythm with these solder joints and finished the lot in next to no time:

Not a bad job considering how infrequently I solder!
Next step was to look at a temporary repair for the lifted trace. I’d already worked out what I’d need to connect on the underside of the board when I had all the RAM chips off. Out came the soldering iron again and I set to work:

Not a pretty job in the slightest, but it’s a temporary fix that will get tidied up at a later date.
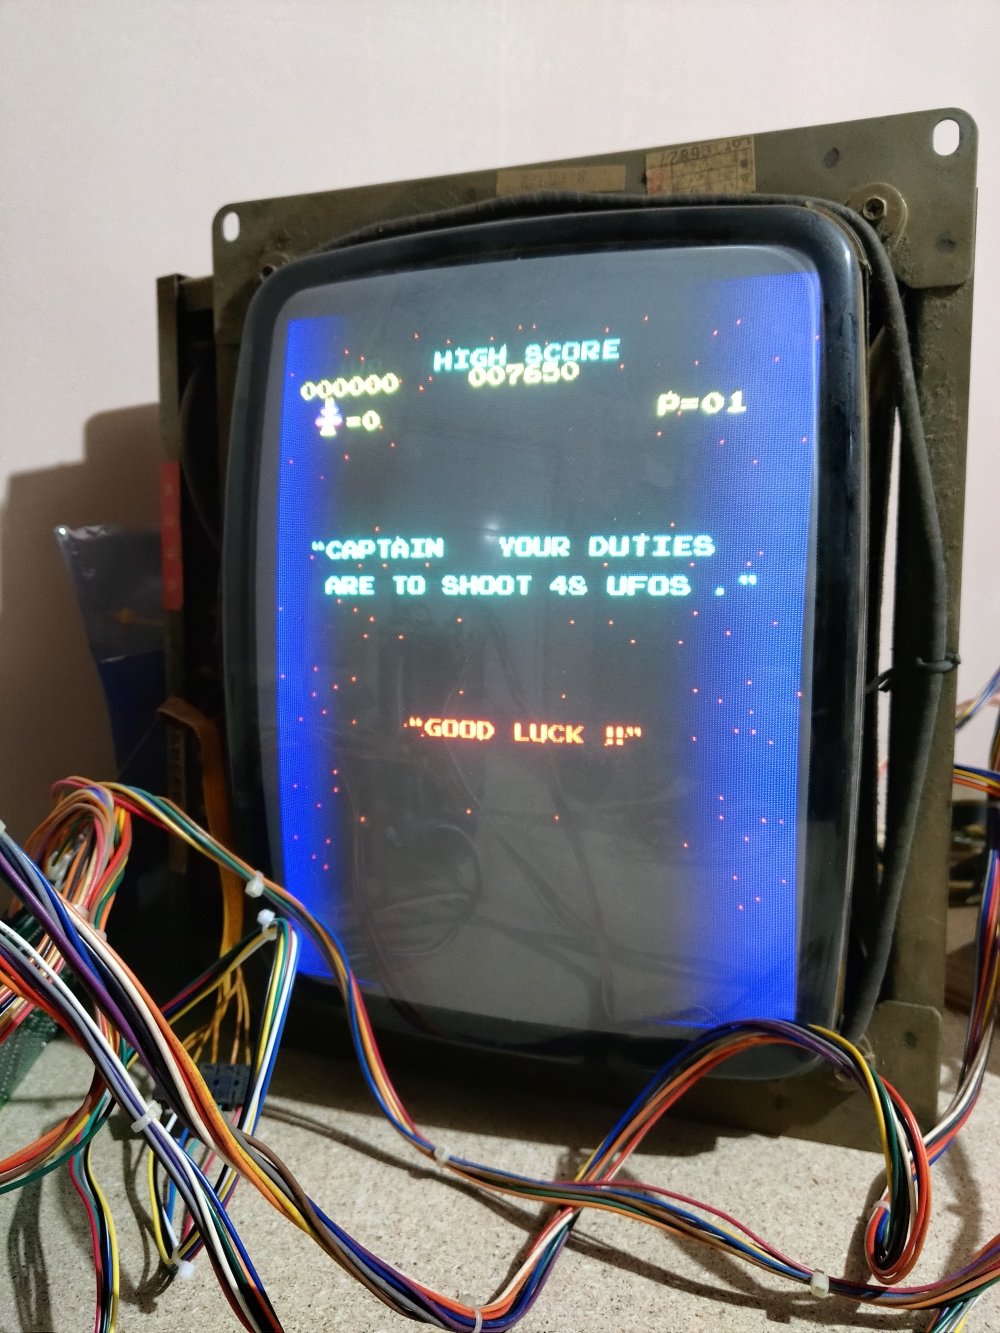
With all the RAM ICs off and sockets in their place, all that was left to do was put the RAM in the new sockets and connect the board back up. I decided to put the old RAM into the sockets so as not to unnecessarily replace all the RAM if only one chip is faulty. With the old RAM in the new sockets and the boardset re-assembled, I connected up the necessary cables and flicked the power switch:

Success!! We had a high score screen that would nicely transition into an attract screen:


So now with an apparently working boardset, I needed to test out the inputs. I hooked up a standalone credit switch that I had removed from another cab and attempted to “coin up” the game. The game added credits with each switch, so all that was left was to connect up some controls and try and play.
I remembered I had the control panels from the Radarscope cocktail kit I’d picked up, but I’d removed the wiring loom for the Sheriff project. I checked my spares box and fitted a Donkey Kong cocktail control panel loom I had (as the only difference was Radarscope didn’t need four inputs for the joystick due to the two-way) and connected it to the boardset:

I hit the “1-PLAYER” button and watched as the game rolled out the next screen:
Unfortunately, this is where it stopped. Everything worked as it should up to the point, but each time I attempted to start a game, it would type out the above screen and then stop. It seemed odd that it managed to get to this point without issue and then hung here, but that’s exactly what it did.
By this time, I’d spent a few hours on the game and I needed to stop for the day. Despite the game not actually starting, I was hopeful in the fact that we were much further on than at the start of the day and were so close to playing the game.

Great update pal. So close! Good progress though. Impressive soldering. I need to practice. A lot..
LikeLiked by 1 person